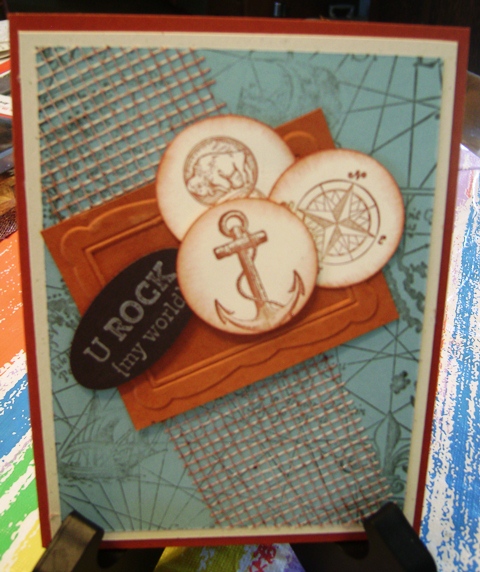
Now here we have a very interesting card for a masculine card or just someone that likes boating or ships.
We layered beige card stock onto the rust (sorry, I don't always know the colors we use0
Then, we stamped a ship themed stamp onto light blue card stock and then layered a strip of sheet rock tape (which we had inked with brown ink) diagonally across the layer. We then attached that to the card.
We layered an embossed frame on top of the sheet rock tape and added the round elements and the U ROCK to the top.
I guess I need to ask what the stamp sets are and what papers we use but we are usually so busy getting our cards done that I forget and figure I can look it up when I get home. But, evidently not ;-)
If you haven't already tried sheet rock tape to add a little something different to your card, try it!!! It's fun!
Thanks for stopping by and always love hearing from you!!
Char
Tuesday, May 1, 2012
Monday, April 30, 2012
Kite Card
Here's a cheerful spring card! We used the set, Send Me Soaring, from the Occasions Mini catalog.
She had all the designer paper already cut out and all we had to do was tape it to the orange card stock. Then, we added a green circle, stamped the kite strings onto the white scalloped circle and attached the kits on top of the strings with mounting tape. We used thirds of a small circle punch ( I think ) to create clouds and attached them with glue dots under the kits.
This card was really cute and would make a fun kids card or even a birthday card. Of course, I opted not to put a birthday saying on the card as I had something else in mind when I made it.
Hope you have a really good day!! Join me, again, tomorrow for another share!
Char
She had all the designer paper already cut out and all we had to do was tape it to the orange card stock. Then, we added a green circle, stamped the kite strings onto the white scalloped circle and attached the kits on top of the strings with mounting tape. We used thirds of a small circle punch ( I think ) to create clouds and attached them with glue dots under the kits.
This card was really cute and would make a fun kids card or even a birthday card. Of course, I opted not to put a birthday saying on the card as I had something else in mind when I made it.
Hope you have a really good day!! Join me, again, tomorrow for another share!
Char
Sunday, April 29, 2012
Masculine Card
Well, I have no clue why all my 'scheduled posts' are not going out when they are supposed to, but I guess I'll have to try and remember to come into blogger and send them out :-)
Here is a cute and simple masculine card. Of course, just change up the papers and it could be used for a feminine card or child's card as well. It was to have had Happy Birthday on it, but I decided to use a Thank You sentiment. Always has to be 'one' in the crowd, huh?
It was easy and fast!!! Love that!!
And, Joanne showed us how to make the ribbon look on the end of the designer paper using a square punch! I love learning new tricks!!
I have to say that I really enjoy these card classes because Joanne has everything already cut out, punched out and all the supplies you need already to add to your project. All we have to do is just put it together!! We might stamp something, too, depends on what it is. It sure makes class go faster and we get 10 ideas all in one afternoon!!
Check back tomorrow, I'll have another card to share!!
Have a fantastic day!!!
Char
Here is a cute and simple masculine card. Of course, just change up the papers and it could be used for a feminine card or child's card as well. It was to have had Happy Birthday on it, but I decided to use a Thank You sentiment. Always has to be 'one' in the crowd, huh?
It was easy and fast!!! Love that!!
And, Joanne showed us how to make the ribbon look on the end of the designer paper using a square punch! I love learning new tricks!!
I have to say that I really enjoy these card classes because Joanne has everything already cut out, punched out and all the supplies you need already to add to your project. All we have to do is just put it together!! We might stamp something, too, depends on what it is. It sure makes class go faster and we get 10 ideas all in one afternoon!!
Check back tomorrow, I'll have another card to share!!
Have a fantastic day!!!
Char
Friday, April 27, 2012
A different quilt card
Another quilt card, but this one was differently. We added all the punched elements to the yellow piece of cardstock, then ran it through the Big Shot using one of the embossing folders. Sorry, I can't remember the name of it. It looks like Square Lattice but I could be mistaken.
Then, we added a bow and brad to the center.
Using the Modern Label punch, we punched under the quilt and then stamped the sentiment onto a white piece of card stock punched out with the same punch and put that on the inside of the card so that it shows through the hole.
The base is a purple card stock and then a light lavendar on top, yellow and then white cardstock, with the coordinating elements punched from the Blossom Bouquet Triple layer punch added to the top of the white.
Then, using the purple card stock, again, we added tiny squares to the corners.
Tomorrow, I'll share another card we made.
Have a great day!!!
Char
Then, we added a bow and brad to the center.
Using the Modern Label punch, we punched under the quilt and then stamped the sentiment onto a white piece of card stock punched out with the same punch and put that on the inside of the card so that it shows through the hole.
The base is a purple card stock and then a light lavendar on top, yellow and then white cardstock, with the coordinating elements punched from the Blossom Bouquet Triple layer punch added to the top of the white.
Then, using the purple card stock, again, we added tiny squares to the corners.
Tomorrow, I'll share another card we made.
Have a great day!!!
Char
Thursday, April 26, 2012
Quilt Card
Good Morning,
Here is another card that we did at stamp class. It was very easy and fun!! It's just layering strips of designer paper onto sticky tape, in a pattern. We were pretty much at the end of the ones doing this card, in class, so we didn't have much of a selection left, but it's ok. I got the technique down and that's all that counts! :-)
Once again, the blossom punch was used for the center and a white paper daisy was set in the middle and a brad to hold it all together.
Another card I will want to do again!!!
Stay tuned for tomorrow's card!!
Have a fantastic day!!
Char
Here is another card that we did at stamp class. It was very easy and fun!! It's just layering strips of designer paper onto sticky tape, in a pattern. We were pretty much at the end of the ones doing this card, in class, so we didn't have much of a selection left, but it's ok. I got the technique down and that's all that counts! :-)
Once again, the blossom punch was used for the center and a white paper daisy was set in the middle and a brad to hold it all together.
Another card I will want to do again!!!
Stay tuned for tomorrow's card!!
Have a fantastic day!!
Char
Wednesday, April 25, 2012
Bigz Die note card
Saturday was card class. We made 10 cards and I will be sharing them over the next week or so.
This card was made using a Bigz Scalloped Circle die and embossed with Final Press embossing folder.
We added a circle punch on top of a yellow ribbon and adhered a scalloped circle to that.
Then, we added a flower punched with the Blossom punch and curled it and added a punched out Blossom Bouquet Triple Layer punch to the inside and added a pearl!
Fast and cute card!!!
Come back tomorrow to see another card made at stamp class!!!
Have a great day,
Char
This card was made using a Bigz Scalloped Circle die and embossed with Final Press embossing folder.
We added a circle punch on top of a yellow ribbon and adhered a scalloped circle to that.
Then, we added a flower punched with the Blossom punch and curled it and added a punched out Blossom Bouquet Triple Layer punch to the inside and added a pearl!
Fast and cute card!!!
Come back tomorrow to see another card made at stamp class!!!
Have a great day,
Char
Tuesday, April 24, 2012
Embrace Life
Here is a very simple card to make.
I used a SU floral set (sorry can't remember the name and I didn't see it in the current catalog) I am bad about putting the name on the box....sigh.
I stamped the flowers in a lilac ink and then stamped the stems in green on Whisper White card stock.
I used my nesties to make the labels and I used a cuttle bug folder to emboss the bottom label. I then stamped some leaves on the very edges of the top label and stamped the sentiment in the middle with the lilac ink. I sponged the edges with the lilac ink.
Before adhering these to the card, I layered a length of green ribbon down the left side of the card and layered a strip of white ruffled ribbon (from Really Reasonable Ribbon) to the top.
I attached a piece of green ribbon, criss crossed to the top, and glued a rolled paper flower to the top of that. Then, I adhered my sentiment to the card.
Simple, easy but spring like, right?
Have a great day!!
Char
I used a SU floral set (sorry can't remember the name and I didn't see it in the current catalog) I am bad about putting the name on the box....sigh.
I stamped the flowers in a lilac ink and then stamped the stems in green on Whisper White card stock.
I used my nesties to make the labels and I used a cuttle bug folder to emboss the bottom label. I then stamped some leaves on the very edges of the top label and stamped the sentiment in the middle with the lilac ink. I sponged the edges with the lilac ink.
Before adhering these to the card, I layered a length of green ribbon down the left side of the card and layered a strip of white ruffled ribbon (from Really Reasonable Ribbon) to the top.
I attached a piece of green ribbon, criss crossed to the top, and glued a rolled paper flower to the top of that. Then, I adhered my sentiment to the card.
Simple, easy but spring like, right?
Have a great day!!
Char
Thursday, April 19, 2012
Wings of Friendship
I dug through my card stock pile and came up with a navy, light blue and white theme for my card, today.
I layered the Whisper white onto the navy and then added the lighter blue on top.
I stamped the Wings of Friendship stamp onto a smaller piece of Whisper White and colored in the wing with chalk to match the underlying card stock.
Then, I chalked the edges with the same chalk color.
I added a checkered white ribbon from Really Reasonable Ribbon, that I had pleated, on top of my card and adhered a few pearls on top. This was a quick and easy card to do!!
Have another card to share, tomorrow!!
Enjoy your day!!
Char
I layered the Whisper white onto the navy and then added the lighter blue on top.
I stamped the Wings of Friendship stamp onto a smaller piece of Whisper White and colored in the wing with chalk to match the underlying card stock.
Then, I chalked the edges with the same chalk color.
I added a checkered white ribbon from Really Reasonable Ribbon, that I had pleated, on top of my card and adhered a few pearls on top. This was a quick and easy card to do!!
Have another card to share, tomorrow!!
Enjoy your day!!
Char
Wednesday, April 18, 2012
Blue and Orange card
I decided that I needed to make a bright card to help brighten the gloomy gray day we were having.
Navy Card stock was used for the base and I embossed a piece of Tangerine Tango Card stock with Tiny Bubbles embossing folder and layered that on top.
Next, I stamped Sprinkled Expressions stamp set from SU in Tangerine Tango ink and stamped the sentiment in Pacific Point ink on a piece of Whisper White card stock.
I sponged the edges of the white card stock with Tangerine Tango ink. I then added some sparkle to the insides of the flowers using a clear atyouSpica pen. Although, I realize you can't see it in the photo.
I adhered a strip of Pacific Point ribbon to the left side of my card with a strip of Tangerine Tango dotted ribbon on top. I then added a rolled paper rose ribbon made out of Tangerine Tango card stock to the ribbon.
See ya tomorrow!
Char
Navy Card stock was used for the base and I embossed a piece of Tangerine Tango Card stock with Tiny Bubbles embossing folder and layered that on top.
Next, I stamped Sprinkled Expressions stamp set from SU in Tangerine Tango ink and stamped the sentiment in Pacific Point ink on a piece of Whisper White card stock.
I sponged the edges of the white card stock with Tangerine Tango ink. I then added some sparkle to the insides of the flowers using a clear atyouSpica pen. Although, I realize you can't see it in the photo.
I adhered a strip of Pacific Point ribbon to the left side of my card with a strip of Tangerine Tango dotted ribbon on top. I then added a rolled paper rose ribbon made out of Tangerine Tango card stock to the ribbon.
See ya tomorrow!
Char
Tuesday, April 17, 2012
Monday, April 16, 2012
Simple cards
Ok, I took a break from making the ribbon woven cards and just made a couple of simple cards using embossing folders and 'jewels'.
The one I am sharing, today, was really quick and simple. I didn't chalk the embossed flowers on the card. I did sponge the two Nestabilitie layers and then added some 'daisy' rhinestones to the middle of the flowers. Simple and easy!!
We don't always have to spend hours making a card. I LOVE using the embossing folders as they provide the design on a card and then you can a few touches to finish it off.
Did you notice that I didn't even use ribbon on this card? I love ribbon and bling!!!
Have a great day!!
Char
The one I am sharing, today, was really quick and simple. I didn't chalk the embossed flowers on the card. I did sponge the two Nestabilitie layers and then added some 'daisy' rhinestones to the middle of the flowers. Simple and easy!!
We don't always have to spend hours making a card. I LOVE using the embossing folders as they provide the design on a card and then you can a few touches to finish it off.
Did you notice that I didn't even use ribbon on this card? I love ribbon and bling!!!
Have a great day!!
Char
Sunday, April 15, 2012
Sunday card share
Here is another card using the ribbon weaving. I used a Darcie embossing folder and colored them with chalks.
I then ran a label four Nestabilitie through the embossing folder and colored that, too, with chalks. I layered the smaller Nestabilitie, which I had sponged with pink ink, on top of the larger one and stamped a sentiment from Penny Black.
I adhered a pink woven ribbon to the top of the card and added small pink 'pearls'.
I'm still playing with this technique so hope to get better as I go along.
Hope you try this fun technique, it's so relaxing to watch TV while you make these ribbons.
Have a Fantastic Day!!
Char
I then ran a label four Nestabilitie through the embossing folder and colored that, too, with chalks. I layered the smaller Nestabilitie, which I had sponged with pink ink, on top of the larger one and stamped a sentiment from Penny Black.
I adhered a pink woven ribbon to the top of the card and added small pink 'pearls'.
I'm still playing with this technique so hope to get better as I go along.
Hope you try this fun technique, it's so relaxing to watch TV while you make these ribbons.
Have a Fantastic Day!!
Char
Saturday, April 14, 2012
My First Card using Ribbon Weaving
Good Morning!!
As promised, here is the first card I did using the ribbon weaving. I think it looks better in person. I am not the best photographer as something gets lost in the transition, but you will get the idea.
I used a SU embossing folder, "Elegant Bouquet" and colored it with chalks. I added pink 'pearls' in the center of the daisies.
A Labels Four Nestabillities was used for the sentiment which is from Penny Black. The little butterfly is also a part of the sentiment from Penny Black
The white woven ribbon was adhered to the left side and then I glued a pink satin ribbon on top.
I have a few more to share with you in the next few days.
Have a great day,
Char
As promised, here is the first card I did using the ribbon weaving. I think it looks better in person. I am not the best photographer as something gets lost in the transition, but you will get the idea.
I used a SU embossing folder, "Elegant Bouquet" and colored it with chalks. I added pink 'pearls' in the center of the daisies.
A Labels Four Nestabillities was used for the sentiment which is from Penny Black. The little butterfly is also a part of the sentiment from Penny Black
The white woven ribbon was adhered to the left side and then I glued a pink satin ribbon on top.
I have a few more to share with you in the next few days.
Have a great day,
Char
Friday, April 13, 2012
Ribbon Weaving
I recently saw a beautiful card that was made using ribbon weaving. I have since taught myself HOW to do the ribbon weaving, although I still haven't been able to recreate this exact card. You can see the card and the supplies she used here. I think it's absolutely gorgeous!!!
I bought all the supplies to recreate it....but am still trying to figure out how to make the heart out of my ribbon weaving. And, then I have to figure out how she made it stand. I'll keep working on that project. :-)
So, here is what I have been busy doing for a few weeks, as I tried to get over the blasted cold that hit our house in February and wouldn't LEAVE!! I felt that I needed to do something since I didn't have the energy to do much of anything else. Hence, I wasn't making cards, either.


Here is where you can see the tutorial on how to do the ribbon weaving!
WARNING, they are very addicting!!!! I have been experimenting with different widths, types of ribbon and even doing two at once. I think the satin works the very best but some of the other ribbons work well if the width isn't too large.
Tomorrow, I'll share a card I made using one of the ribbons. I am still hoping to sort of recreate the card that prompted me to start making these.
Have a Fantastic Day!!!
Char
I bought all the supplies to recreate it....but am still trying to figure out how to make the heart out of my ribbon weaving. And, then I have to figure out how she made it stand. I'll keep working on that project. :-)
So, here is what I have been busy doing for a few weeks, as I tried to get over the blasted cold that hit our house in February and wouldn't LEAVE!! I felt that I needed to do something since I didn't have the energy to do much of anything else. Hence, I wasn't making cards, either.

Here is where you can see the tutorial on how to do the ribbon weaving!
WARNING, they are very addicting!!!! I have been experimenting with different widths, types of ribbon and even doing two at once. I think the satin works the very best but some of the other ribbons work well if the width isn't too large.
Tomorrow, I'll share a card I made using one of the ribbons. I am still hoping to sort of recreate the card that prompted me to start making these.
Have a Fantastic Day!!!
Char
Friday, March 16, 2012
Masculine Birthday cards
These are the last of the stamp club birthday cards that were made last month. I like how she includes masculine cards from time to time as I think sometimes those are the hardest to come up with ideas for.
Hope you enjoyed these. I have received some really cool RAK cards that I will be sharing soon. Hopefully, in the next few weeks I will actually have some that I made ;-)
Have a great weekend!!!
Char
Thursday, March 15, 2012
A few more February club cards
I thought this card was really bright and cheerful!!
A masculine birthday card!
Tomorrow will be the last of the Stamp Club cards. Hope they have inspired you a little!
Char
A masculine birthday card!
Tomorrow will be the last of the Stamp Club cards. Hope they have inspired you a little!
Char
Wednesday, March 14, 2012
Still More February cards
Oooops, I said that these cards were March cards in one of my prior posts.....guess I was getting ahead of myself.
Anyway, here are two more cards from last month's stamp club.
All supplies are from Stampin Up. She really does do some colorful cards! Love them!!
Char
Anyway, here are two more cards from last month's stamp club.
All supplies are from Stampin Up. She really does do some colorful cards! Love them!!
Char
Tuesday, March 13, 2012
More stamp club cards
I thought that the above cards were so cute! The theme I think for last month was Birthday cards. I liked that she used all kinds of different elements on the cards.
Stay tuned for tomorrow's cards.
Char
Monday, March 12, 2012
February Stamp Club cards
I have been fighting this dang virus like most everyone I know and I did NOT go to stamp club last month, but the friend I go with made my cards for me and brought them over. Isn't that awesome?? So, I have 10 cards to share in the next few days.
I am not going this month so I might have to get busy and do some cards although, I haven't been in the card making mood lately so I may just share ideas I have gleaned from some other blogs. There are a lot of cute Easter ideas out there. But, that's for another post :-)
Here are a couple that were made. I am sorry the one didn't photograph well, it was the photographer not the card ;-)
I'll share the others over the next few days.
Have a great day!!
Char
I am not going this month so I might have to get busy and do some cards although, I haven't been in the card making mood lately so I may just share ideas I have gleaned from some other blogs. There are a lot of cute Easter ideas out there. But, that's for another post :-)
Here are a couple that were made. I am sorry the one didn't photograph well, it was the photographer not the card ;-)
I'll share the others over the next few days.
Have a great day!!
Char
Monday, March 5, 2012
Monthly Ribbon Club
Haven't felt up to stamping and/or blogging for the past month or so. That creeping crud attacked our family mid January and I have been under the weather ever since.
I do have 10 cards that my friend, Jenny, made for me at our local stamping group last month and I plan on uploading them. In the meantime, I wanted to share what I have received in my March Monthly Ribbon package from reasonableribbon.com and I have to tell you it's even better than last month's, if that is at all possible.
Here is this month's package:
They are just gorgeous in real life!!!
If you haven't visited reasonable ribbon to see all the gorgeous ribbons, you need to. If you have been vacillating back and forth (as I had for months) about signing up for her ribbon club...DO IT!!! She sends them out the first part of the month and I am ALWAYS delighted with the selection.
And, just so you know, I have no affiliation with RR except that I love their ribbon!!
Here are the other pkgs I have received the past few months:
I look forward to my little piece of happiness every month. I sometimes HATE to cut into them!!
Have a great day!!!
Char
I do have 10 cards that my friend, Jenny, made for me at our local stamping group last month and I plan on uploading them. In the meantime, I wanted to share what I have received in my March Monthly Ribbon package from reasonableribbon.com and I have to tell you it's even better than last month's, if that is at all possible.
Here is this month's package:
They are just gorgeous in real life!!!
If you haven't visited reasonable ribbon to see all the gorgeous ribbons, you need to. If you have been vacillating back and forth (as I had for months) about signing up for her ribbon club...DO IT!!! She sends them out the first part of the month and I am ALWAYS delighted with the selection.
And, just so you know, I have no affiliation with RR except that I love their ribbon!!
Here are the other pkgs I have received the past few months:
I look forward to my little piece of happiness every month. I sometimes HATE to cut into them!!
Have a great day!!!
Char
Wednesday, February 8, 2012
Last of the Valentines
Here are a couple more Valentine cards that I made last month.
Basically the same design but changing up where I put the Martha Stewart border punches. The digi design is from Patty Wraps. I added the adorable heart ribbon from Reasonable Ribbon along the side and also added a bow at the bottom. The designer paper is some I have had a long time. I colored the Valentines with At You Spica pens and added some little valentine jewels.
More pink this time. I love using pink and red together. The digi design is from Patty Wraps. The cute ribbon is the polka dot ribbon from Reasonable Ribbon and then I added a little piece of conversation heart ribbon to the top and tied it all together.
I made quite a few cards using these basic same supplies just re-configuring them in different ways. Try it, if you haven't already. Get all your basic supplies out....but by cutting them in different ways, adding different borders and ribbon and embellishments, you will find that you can get quite a few cards with one basic idea.
Have a God blessed day!!!
Hugs,
Char
Tuesday, February 7, 2012
Valentine Cards
I have been busy making Valentine cards for my family! I have already sent them all out and know that they don't check my blog, so am going to share some here over the next few days.
I made this one for my Granddaughter.
Had a little too much fun with the border punches, here....one is from Martha Stewart and the one in front is from SU. The polka dot ribbon is from Really Reasonable Ribbon. I belong to their monthly ribbon club and love getting a cool pkg of different ribbons each month. Can't remember where the designer paper came from, whoops! It was just some I have had in my drawer for awhile.
Here again loved using these border punches together. The Digi design is from PattyWraps. You can download it from her blog. I LOVE it!!!
The ribbon is from the monthly ribbon club from Really Reasonable Ribbon. You might want to check it out. I love getting a different package every month.
I used At You Spica pens to color in the hearts and crystal lacquer to give them a little shine. Then of course had to add a little 'bling' :-)
I'll be back tomorrow to share a couple more.
Have a God blessed day,
Char
Monday, February 6, 2012
Stamping class cards
Had a great time last month at stamp class and thought I would share what we made. We made a few Valentines and some general cards. A lot of variety, I think.
Cute birthday card!
Love how it's punched out and the words show through.
This clown card was so cute but I know I wouldn't make another one...too many pieces ;-) Love Pink and Red together!
Again, too many pieces, but it was a fun card!
Cute little box that fits four little chocolate candies for my DH.
A cool manly card!!
Fun and very easy card!!
Adorable heart card that is put together with a brad.
Tomorrow, I will share some Valentine's I have been making!
Have a great day!!
Char
Subscribe to:
Posts (Atom)