Pages

Tuesday, July 30, 2013

Where has the time gone?


It's been over a month since I last posted anything.

During the summer months, it just gets so busy and then, too,  it's just too hot in the office to spend much time here, even with a fan going.  Unless I get in here EARLY in the morning.

I decided that this morning, I should do just that....


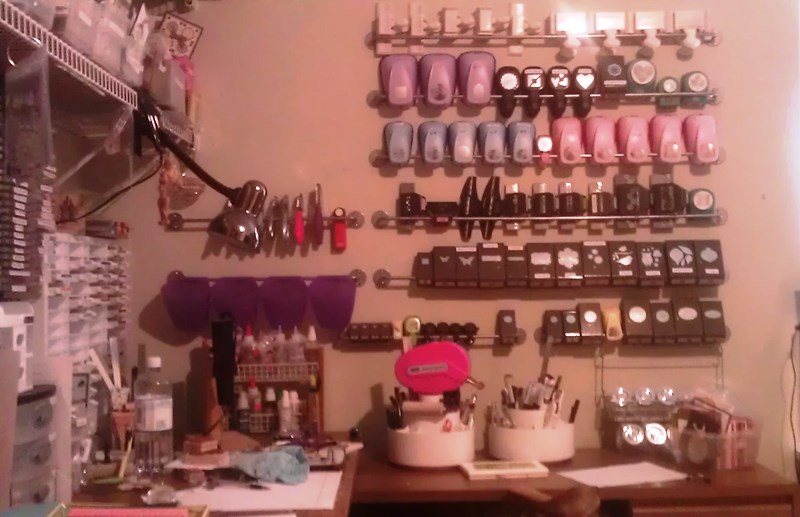
I wanted to share my new Bygel Rails for storing my punches, near my desk.  I had to wait till I could get up to Portland to an IKEA store and that happened in June!!

I was so excited to have these installed by hubby and as you can see, they are already FULL!  But, there is room at the top for more rails, (you just can't see that in the photo) if I need to put a couple more :-)

I'll be sharing some more photos, over the next few months, as I once again reorganize my stamp room.  Sheesh, does everyone do this as much as I seem to?  I just can't seem to stay satisfied with how I have it arranged.  OR I see a new idea and need to give it a try.

I think it's time for some major purging, too!!!  There are items I haven't used in years or am no longer am interested in using...but the minute I get rid of something, I know I'll need it.  Am I alone in this?

So, I really need to do some major rethinking as to what I reallllly need and what needs to go.

Have a great day!!!

Char


Monday, July 8, 2013

I Pod card

I think this would make a great card for a teenager or younger for that matter.  I don't know if they call them I Pods or what now....can't seem to keep up with the terms, but it's basically a player for music.  :-)

The card is simple to make....and you can probably figure it out just by looking at it.

I didn't take down the dimensions as we made it, so could only guess at the sizes, now.  Sorry, I get so busy actually making the cards that I don't remember to write down the directions and then forget when I get home :-(

But, it's fairly simple and you could even put a message or a name of a favorite song on the white piece on the front or a gift card inside for them to buy some of their favorite tunes.

Can you tell I really don't know what the heck I am talking about??   I have an MP3 player but know nothing about the newer gadgets out there.

My Granddaughter tries to enlighten me, but I am happy enough with my little MP3 but it's hard keeping up with all the new technology out there.

Have a great day,

Char

Wednesday, June 19, 2013

Graduations are over

Well, it's all behind us, now.  Both graduations are over and they were fantastic!!

There was a lot of running to do between the two graduations but I made the trip up and back to Washington state for the first graduation, safe and sound and then hit the pavement running to get stuff done for the second graduation.  :-)

But, it all came together like it was supposed to...thankfully!!

Here is the Graduation card I gave my Granddaughter for Graduation.


Here is a Graduation card a friend of mine made for her.  It is too stinkin cute!!!


She had a very enjoyable day with friends and family here to celebrate with her.  My hubby barbecued burgers and we had potato salad and baked beans among other things.  We got a cake with her school colors which happen to be the same as Halloween colors.


She doesn't like having her photos on any websites or Facebook so I will respect her wishes and not post them.

So, now with graduations and Father's Day over....I can get back to stamping once again.

Have a great day!!!

Char

Tuesday, June 11, 2013

Orange and White cupcake card

Love this card!!!

We used the Cupcake Builder punch and the decorative label punch (from S.U.) on this card.

We punched the decorative label out of white card stock and layered a piece of polka dot paper behind it and adhered it to the orange card stock.

We used the Essentials Paper Piercing pack from SU and pierced around the decorative label punch out.

Adding some ribbon and a bow and a sentiment.... finishes it off.

HOW FUN!!!  Simple, yet so dang cute.

Have a fantastic day!!!

Char

Monday, June 10, 2013

Two step stamping

Love the two step stamping technique although I forget to do it a lot of the time and I don't always have the proper stamps TO do it.

Here we have a tulip stamp (not sure if it's discontinued or not) and we stamped it in shades of lavender and the stems in green.

We layered the Wisteria wonder card (?) (I keep planning on writing all these colors down while I am actually at stamp class....but get too busy yakking and making my cards) with white, green, Wisteria wonder and white again.

We added a green striped ribbon across the card between the actual card and the layers.

So simple.....and could be made for any occasion!!

Have a great day!!

Sunday, June 9, 2013

Yet one more Graduation

We will be attending yet another Graduation this afternoon for a friend, whose Son has been home schooled.  

I found out what his favorite candy bars were and made him a candy bouquet, too.

He really didn't have graduation colors, so I just used a Graduation cap like I used in my Granddaughter's bouquet.

Do you see all the PayDay bars in there?  That's one of my most favorite candy bars!!!
He is so fortunate that I am off sugar....cause I don't know if they would have survived :-)
Hope he likes it!!!

It is really fun to make these bouquets and I think I'll be trying to figure out other bouquets I can do using different items.

Have a great day!!!

Saturday, June 8, 2013

Happy Graduation!!!!

Well, today IS the day we have been waiting for!!  Our youngest Granddaughter will be graduating, today.

I wanted to share what I made her for part of her celebration!!  It's a candy bouquet.  I found some star balloons in her school colors and made her a tiny Graduation cap (with Hershey Kisses inside) and added a lot of candy bars that she likes.  It is PACKED full of candy but the photo doesn't show it very well.
I also put in some little mints that said "Happy Graduation" on them.
I am sure she'll enjoy this bouquet :-)

Friday, June 7, 2013

Orange and Brown card

Another simple card that you can make for almost any occasion by just changing up the colors and maybe even adding different bling to the flowers.

I like quick cards as it seems I am always having to come up with a card for something and don't always have the MOJO going on....so having a variety of these simple cards in stock works just great!!

Today is the day before our Granddaughter's Graduation and there is a lot to do to get ready and I hope to have some fun things to share with you after Graduation is over.

Have a great day!!!


Char


Thursday, June 6, 2013

Another Graduation

Our oldest Granddaughter is graduating, tonight, from her special needs program.  She graduated from high school a couple of years ago and we had a graduation party for her here when she came to spend the summer.

This is a special program that special needs kids attend AFTER Graduation until they are 21 that helps them transition into the world.

Anyway, I made her a special Candy Bouquet to give to her that night.
I think she'll definitely enjoy it :-)

Then, we are coming home to decorate the house for her Cousin's graduation in two days!!!

Our other Granddaughter is so excited that she will be here for her Graduation as she was there for her High School Graduation.

Anyone feel led, I would appreciate prayers for safe travels as it's a 6 hour round trip drive.

Have a great day!!!!
Char

Wednesday, June 5, 2013

Graduation Cap

Well, the day is coming soon and this is what I made for our Granddaughter on her special day.

They were super fun to create and I got the idea here.

This is what is on the underside.
Their colors are black and orange so how fun was it to find Hershey Kisses that had Orange foil?


Have a great day!!!

Tuesday, June 4, 2013

Teacher Appreciation Pencil Box

 I made my Granddaughter's little appreciation gifts for each of her teachers.  I know she is 18 and maybe they don't do that much any more but I wanted to thank them all for being a part of her life these past few years.

This is the box I decorated (it was the original box that came with an assortment of candy bars that I used to make some candy bouquets).

I used black card stock to decorate the sides and then orange for the top with some black card stock to outline the actual thank you.

Then, I just added some stickers and lined the box with tissue.     
Then, I added all the 'pencils' which are really Rolo candy and a hershey kiss.  I got the idea here and here.

These are so fun to make and go rather quickly once you get all the paper cut and sponged.  Quickly, being a few hours.....but hey, with a movie on.....it works for me :-)

Have a great day!!!!

Char

Monday, June 3, 2013

Red, White and Blue Father's Day


And, yet another Red, White and Blue card that can be used for different occasions.  Here we are using it for a Father's Day card.

On a red card stock base, we adhered a embossed white piece of card stock.  Then, we added two square pieces of red card stock with a little smaller square of designer paper.

We put them at opposite ends of the card and layered a piece of blue striped designer paper over them.

Then, we added a blue and beige striped ribbon to that and added punched stars out of red and white card stock.  Adding a sentiment tops it off.

EASY to put together and I just LOVE the stars!!!!

Have a great day!!!

Char

Sunday, June 2, 2013

Graduation is coming

Graduation is just around the corner.  Our Graduation here is on June 8th.

Since we have a Granddaughter that is graduating, I have been working on several different cards both at class and here at home.

This is one we did in class.  Of course, I had to do it a little different and not quite sure I like the gray on gray so much.

I goofed and got a little ink on my card stock so had to layer the ribbon diagonal.  Oh well...it works :-)

This card was made using SU stamps and designer paper.

Saturday, June 1, 2013

Red, White and Blue Happy Birthday

 Here is a card that can be used for a Birthday card or a 4th of July card or really any kind of event just by changing out the colors and designer paper.

We used the Scalloped Square die cut from Island Indigo card stock (Or I should say she did as she had these all done ahead for us)  Then, we attached a piece of Real Red card stock on top of that and added  a piece of designer paper on top of the red and then we added strips of alternating Real Red and Island Indigo card stock across the bottom and then attached an Oval Framelit from Island Indigo and a white Apothecary Accent Framlit on top of that, with a sentiment stamped in Real Red.  We then topped it off with two silver brads.

Hope you like it!

Have a great day!!!

Friday, May 31, 2013

Graduation 2

Here is yet another Graduation card that we made at class in April.

Our SU demonstrator already had all the triangles cut for us so all we had to do was just choose which ones we wanted to use.

I love using the glitter paper.

More Graduation ideas coming!!

Thursday, May 30, 2013

Butterfly Swirls

Since I was making butterfly cards, I found a TAC stamp that I had forgotten about.  It's called Butterfly Swirls.  It was one of my favorite stamps a couple of years ago but after TAC went out of business, I hadn't been using my TAC stamps as often.

Anyway, I had fun with this card....maybe too much fun because it's REALLY busy!!!!

I punched out butterflies from the pink polka dot card stock and then it kind of looked a little 'flat' so I used those punched out butterflies and attached them to the card and added pearls.

But then, the top seemed like it needed something more than just punched butterflies so I stamped the Butterfly Swirls and cut it out and attached it and then added Stickles.

I think it's a little over the top but then my Granddaughter liked it, so I can always give it to her :-)

It is fun just giving yourself a challenge to use only two or three colors and certain images and see where it takes you.

Have a great day!!
Char

Wednesday, May 29, 2013

More butterflies


Ok, I promise no more butterflies for a while.  Well, at least not pink and black!!

The last pink and black card I made, I used SU glitter paper and punched out the label and the butterflies.  Then, I added pearls that had been colored black.....and stamped HELLO in white Staz On.

I made quite a few of the Pink polka dot and white card because I really loved it, when it was finished.

I just added an embossed white layer to the polka dot card stock (which I got from Amuse) and added a label and butterflies punched out of the same card stock.  I then added some pearls to each butterfly!

Simple card but I think it's bright and cheerful!!
Ok, I promise to do something other than pink and black or butterflies in my next post.

Have a great day!!!
Char

Tuesday, May 28, 2013

Punched Lion

Isn't he just too cute??  We did this card at stamp class this month.

He is so easy to do by using your Blossom Punch.  You will cut two of these for his mane and one partial one for his feet and then sponge the edges.

For his face, use the 1 1/4" punch and the 3/4" punch for his cheeks and sponge them as well.

Then, use the heart from the Owl punch for his nose and add Googly eyes and you are done.

Well, not exactly, you can then add the little banners or something else of your choosing and a sentiment and THEN you are done!!

I am going to be making more of these but with different designer paper and other colors.

ENJOY!!!

Char

Monday, May 27, 2013

Scallops and Buttons

Thank you to all the Veterans and those that are currently serving in the armed forces so that we can live in the land of the free!  So many times, we take our freedom for granted.  This is not a perfect country but is far better than many!

Please take a moment to remember those that have fought and/or given their lives so that we can be live in America!!

If you have the opportunity, today, thank a Veteran or someone that is currently serving in the armed forces.

But, most of all, pray that those that are serving know that they are appreciated and their families, who are left behind, as well.

This was a fun card to make.  We placed the scalloped circles (she had them all punched out for us ahead of time) on our cards and then punched out the circles inside, through the card itself.

Then, we attached the little stamped white circles  to the inside of the card (again, she had them punched out for us).

We adhered buttons to the circles and little tied ribbons.

Adding 'banners' to each scallop finished off the card.

Simple and fun to do!!

Hugs,
Char

Sunday, May 26, 2013

You're Such an AMAZING......

 Here again are two cards I made at stamp class.  The first one is the one our demonstrator designed.

The second one, I accidentally taped the fold shut and wasn't able to put the tag inside the fold, so I opted to put it on the inside of the card and then forgot to take a photo to show you.

On the inside of the second card, I am going to write or stamp.....a word that says SISTER or FRIEND or whatever. I'll wait till I decide who to send it to before doing the stamping.  I just have to figure out what to do with that spare space at the top right.
Have a great day!!!

Saturday, May 25, 2013

A Cup of Thanks

Another card we made at stamp class.  We cut out the tea cup and adhered it to the white card stock and then layered it onto brown card stock and then attached that to the card.

We used a flourish stamp set that she had borrowed from another stamper and some old designer paper.

Quick and simple card!!!

Hope you have a great day!!!
Char

Friday, May 24, 2013

Pink and white butterflies

I went to stamp class on Saturday and since there were only four of us in the morning class, our demonstrator offered to let us make two sets of cards, if we wanted to pay the extra $10 so I jumped on it as I hate sending out the cards that we make in class as I like to keep them as samples to look at when I make more cards and I don't always get around to doing that, right away.
Here is the card we did following her example:
And, then I made a little mistake on the card, so I just re positioned the butterflies and came up with this card:
She thought I did it on purpose but I kind of like them flying about like this.
I seem to be in a butterfly stamping mode, lately!!!

Have a Happy and SAFE Memorial Weekend!!!

Char

Thursday, May 23, 2013

Black and Pink polka dot butterfly card


Here again, I was playing with this wonderful polka dot card stock and decided to just make a couple more pink and black cards.

On the first one, I added pearls that I had colored black with a permanent marker.  On the second card, I just left then natural.   Not sure which one I like best.

I love color challenges, it gets you to thinking outside the box!

Have a great day!!!
Char


Wednesday, May 22, 2013

Pink and Black butterfly card

I had to make a card for a Pink and Black swap and so I came up with several ideas including this one.  Not sure which one I will choose to send but it was fun trying different ideas.

I had to punch out some labels for some other cards and just couldn't throw the piece of card stock away so I opted to use it on this card with a piece of pink card stock behind it that had been
embossed with a Daisy embossing folder.     The pink polka dot card stock is from Amuse and I just love it.

Just goes to show you can use up scraps on cards and sometimes it looks as if you planned it that way.

Have a great day!!

Tuesday, May 21, 2013

Lovely as a Tree


Hmmm, didn't quite turn out exactly as I had planned.....but sort of got the idea I was going for.  The masking is hard to do because I wasn't too fussy cutting out my mask.  Might have to take a day and perfect this technique using this stamp set.

But, I issued a challenge on a Yahoo list to make a card using only scraps from a scrap pile and so that's what I did.

Have a great day!!

Monday, May 20, 2013

Debbie Macomber's new series on TV

Just thought I would tell you, if you didn't already know, that Debbie Macomber has made her series, Cedar Cove, into a series on TV and it will air on the Hallmark channel.

One ad says June 19th and another says July 20th....so am not quite sure which date it airs but you can go to the blog below and check it out.

I think, if I understand it correctly that the movie will air on June 19th and the series will start July 20th.

I have signed up to receive updates from It's a Wonderful Movie as she keeps her readers informed of wonderful family  movies that air on Hallmark channel as well as others.

I find this blog really helpful as she also publishes a huge list of all the movies during the holiday season and I print it off and keep it on my end table.

If you have never been to her blog, check it out!!

Have a great day!!
Char


Sunday, May 19, 2013

Alphabet Swap - A

I joined an Alphabet swap and of course the first letter is A.  After I had joined, I went to check out my stamps and couldn't come up with anything that started with A.

Oh I could have chosen an Animal and called it good but that was too broad.

I finally came across an Angel I found.   That works!!!!

Not overly excited about this card but it is what it is!!!  I just couldn't get my mind wrapped around how to do the card.  And, the deadline was fast approaching so I went with what I had.
Afterwards, I wished I had left the crocheted lace off and used something else but wasn't about to tear it off the card and start over.  And, I hate the bow at the top.

I did use BLING to compensate for lack of imagination :-)
Do you ever make a card that you are not 100% excited about but since the deadline is fast approaching and your mind is not coming forth with anything BETTER, you just go with it?

This is probably why THIS stamp is housed out in the garage in my stamping drawers rather than in my stamp room!

Hope that the recipient at least likes it a little :-)  She will have received this card by the time this posts.

Have a great day!!!

Saturday, May 18, 2013

Artist Choice Swap

This is a card that I made for a swap on one of my Yahoo groups.

I used card stock from a stack I have sitting on my desk that I need to get used up because it's a piece of this and a scrap of that.   I figured if I keep it in sight that I would be more likely to use up what is there.

I used the Elegant Butterfly punch from SU to punch out my butterflies and then added four pearls (from Amuse Studios) to each other them.  I added the same pearls around one of the scallops.

The hello sentiment is from TAC, which is no longer in business.
I don't remember where the designer paper came from and I wish I did because I LOVE it!!

Have a great day!!!

Friday, May 17, 2013

Lovely as a Tree

This is probably my favorite SU set of all.  I know it must be a huge seller as it is still not retired!!  I just had to get it, this year, though as I am pretty sure it won't be around forever and I would hate that I missed out.

I know this is not Fall season but I just had to make a card when I received my stamp set.  I am sure that this coming Fall, I will be stamping the rubber off this set.

Love the ribbon and wish I could remember where I bought it.

Have a great day!!!


Thursday, May 16, 2013

Thinking of You

Some days I just don't want to stamp but would rather create cards using decorative paper, punches and a sentiment.

There are so many cool papers out there just waiting to be used :-)   And, if you know anything about me, you KNOW I love punches.

The variety of ideas you can come up with are endless.
This is simple and yet adding a few rhinestones here and there add a little interest to the card.

Have a great day!!!


Wednesday, May 15, 2013

Oreo Cookie Card

 YUMMMMMMMMMMMMMMMMMMMM, Oreo Cookies.  Although not one of my favorites, they are my Granddaughter's favorite.


 Is this fun or what???  We created this card at stamp class using a 2" scalloped circle Die and another circle punch that had been embossed.  Sorry, but they were already cut out for us so am not sure which size the Circle punch was....but a tad smaller than 2".
Here is the card slid open so you can see the white 'frosting' inside.
Then it was just a little scalloped oval and regular oval punch to create the verse.

This was a fast card to put together and I can't wait to recreate it using green card stock in the middle for MINT!!!

Tuesday, May 14, 2013

Paw Print Card


 The first card is a fun card we made in stamp class using punches.

Of course, I had to come home and recreate the card using card stock and ribbons of my own.   And, I opted out of using brads just cause I was lazy :-)  But, I do think that the brads lend a more finished look.

As you can see from some of my more recent posts, I LOVE creating cards using punches!!   One can never have too many punches!

Have a dog gone good day!!!!


Monday, May 13, 2013

Twirly Whirly Birthday

Here is yet another fun card we created at stamp club in April.  

This one was using the Wishes Your Way stamp set, the Pinwheel Sizzlits S Die and the Cloudy Day embossing folder.
Very colorful card and the pinwheel was pretty easy to create using the Sizzlits die and a brad.

Have a Twirly Whirly Day!!!

Char

Sunday, May 12, 2013

Happy Mother's Day

This is the Mother's Day card that I sent to hubby's Mom.  She should have gotten it by now and she doesn't even have a computer or read my blog so I am safe to post it.

I think it looked better in person than photographed, but oh well.

It was fun to do and hopefully, she'll like it.

Hope you all have a wonderful Mother's Day!!


Saturday, May 11, 2013

Hello Kitty

This is such a FUN card to put together.  Actually, all you need are punches.
I used SU Pretty in Pink card stock that is being retired.  Oh I hate that...because I really love this pink!!   But, what do you do?
I don't have the butterfly punch that was used for her bow, either, but a friend offered to punch some out for me.  I was told that you could use two heart punches to create the bow but I don't have the right size heart punch.
I know that I have seen this cute card on another blog, and also variations on Pinterest, too.

They are fun, simple to do and people enjoy receiving them.
Here is my variation of the same card.  I used Regal Rose for the card stock on this card.  The card stock is white but somehow it showed up as tinted pink when I took the photo.


 Anyway, it's a fun card to create and I am sure anyone would enjoy receiving it.  I know both my Sister, who is 71 and my Granddaughter liked it.

Have a great day!!!

Friday, May 10, 2013

Shades of Blue


Sometimes, OK a lot of times, I love creating cards that are monochromatic. All different shades of the same color or even all the same shade.

It's simple and clean and you don't have to do any coloring (which I have not perfected, yet).

For this card, I used a piece of Stampin Up's Print Poetry pack.
I stamped the Blooming Kindness flower onto Whisper White card stock and then stamped and cut out a small butterfly that I had stamped from a TAC stamp.  I added a couple of  pearls to the butterfly.  I layered the image to the Print Poetry and then layered that onto a white card.

Here is another look at the same set done a little differently.


On this card, I stamped all over my white card stock and then cut out some of the flowers and added them on top for added dimension.  I even stamped some of the flowers using Versa mark and then embossing those with white EP.  I stamped a little butterfly that I had from TAC and cut it out and added it on top of one of the flowers.

It just goes to show that you can take one stamp set and do a lot of variations using different techniques.

I think one of these days I will take a stamp set and try just that....see how many different variations I can come up with.

Have a great day!!

Char


Thursday, May 9, 2013

Coffee Card

We made this fun card in class in April.

Sorry, I didn't get the names of the stamps or the paper we used.  I think it was supposed to be a Mother's Day card but since I only send one Mother's Day card out each year, I decided that it could be just a friendship card.
Here is it laid out for you to see.
I think it could probably be used for just about any occasion but I am going to use it as a HI how you doing, card!!

Have a great day!!!!