Pages

Saturday, August 31, 2013

A tribute to our Son Gene and his Crystal Dome greenhouse

Our Son, Gene, built his own greenhouse using six sided units put together to form the green house.  When I had first seen the images of the wood pieces, I thought he had purchased them.  When I found out he MADE each and every one of them.....I was blown away.  I always knew he was good at building things and fixing things but being measuring challenged, myself, I was so amazed by this project of his and just had to share it with others.

I am only sharing a few photos to give you an idea of what it looks like but he took a ton of photos.  Hopefully, I got them all in the right sequence but even if I didn't, you have to appreciate all the hard work that went into this project....I know "I" do.

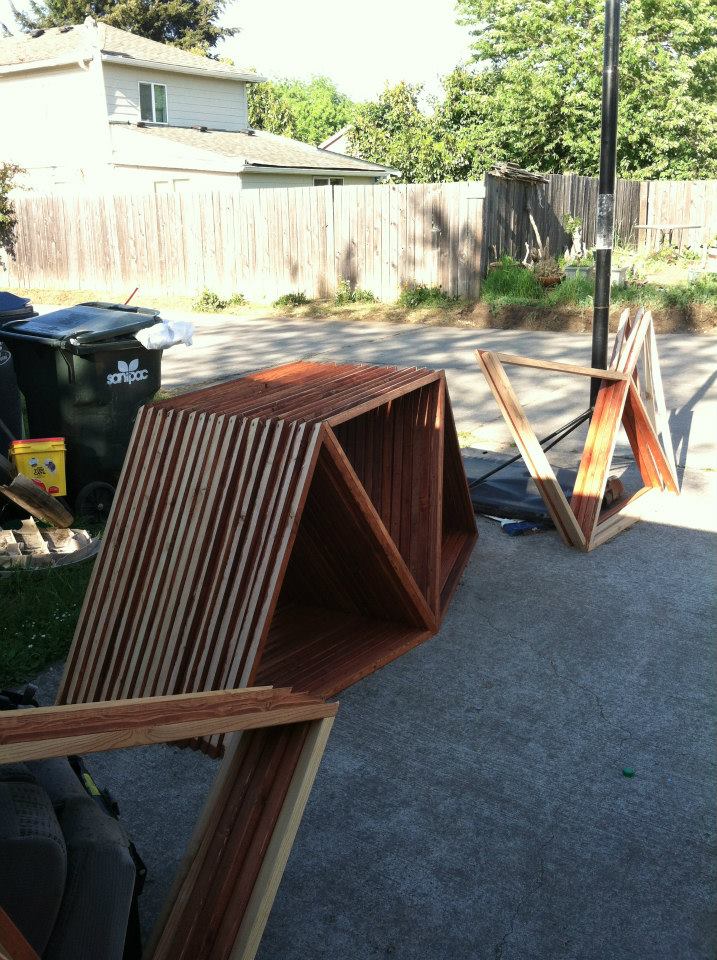
This is where it all began....in the shop!


After getting all the components finished, he laid out the perimeter of the greenhouse with stones and dug the hole for the water feature.


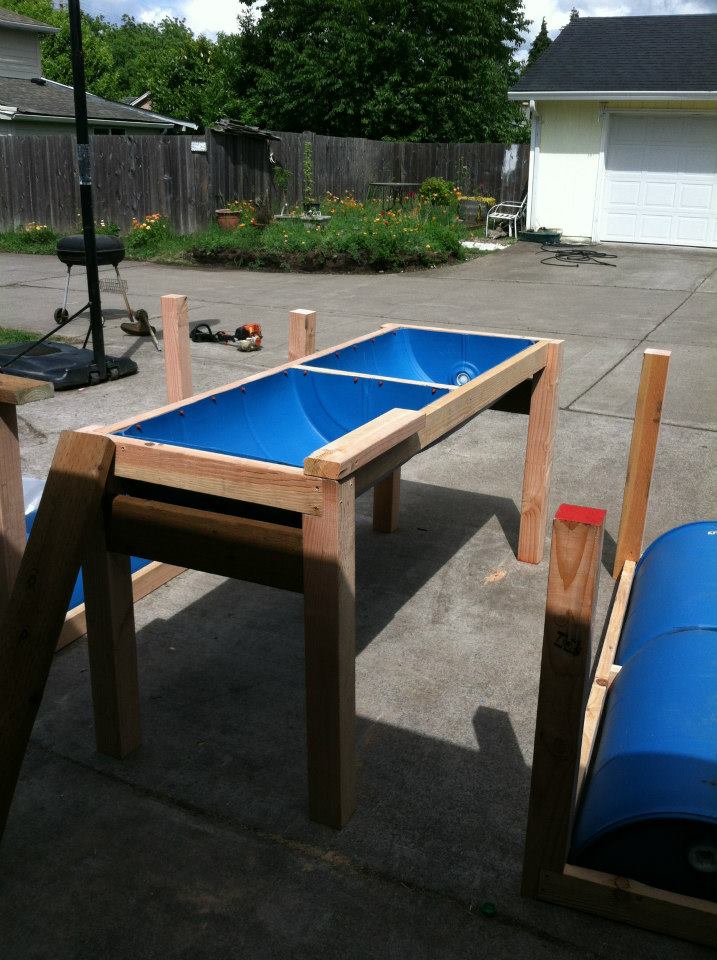
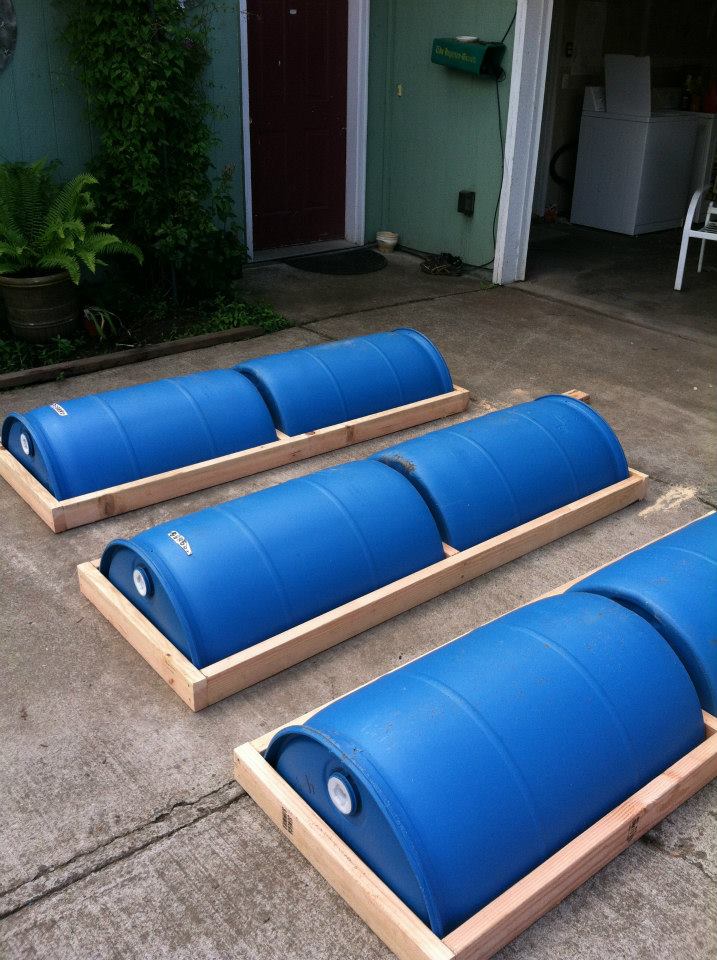
 He cut barrels in half to be used for the planters.

He set them inside the perimeter of the green house and began the plumbing of the water feature and planters.


 Next, came putting the components together to form the green house.  A lot of work and careful measuring!


As each level of components (for lack of a better description) was put up, he had to stretch special plastic over the sides.  That is what took time!


 Next came the setting up of the water feature and getting it plumbed so that the water recycles from this water feature up to his planters so that they water on a set time schedule.
Don't even ask me to try and explain it all.  I was just amazed at how he figured all of this out.  But it was fascinating!!

 He even added a rock like feature behind the barrel so that the water comes down into the barrel like a fountain.

One of the cats checking out his new water hole :-)
                                      He added some plants


Then, added some more
  
The planters with plants growing in them.

                                             The finished project!!!


And, here he is admiring his finished product.  :-)

We went over and saw it in June but he has done so much more since then so I can't WAIT to see it all finished!!

Beautiful job, Gene!!!!

Friday, August 30, 2013

Greetings of the Season

You'll begin seeing a few more Christmas cards from now on.  By the time Christmas gets here, I should have quite a stash to send out this year.

Here is a fairly simple one we did at our August stamp class.

On a red card, we layered a piece of brown card stock measuring 4 1/4" by 2".  We embossed that with an embossing folder ( use one of your choosing).

We adhered that to the bottom half of the card.

We used a piece of vanilla card stock measuring 4 1/4" x 3" and stamped a bough in Soft Suede ink.

Then, we punched out an ornament from designer paper using the Ornament punch.

We added a strip of accent paper to the middle of the ornament and attached a bow.

Then, using soft suede we stamped the sentiment.

This was truly a quick and easy card!!

Have a great day!!!

Hugs,
Char

Thursday, August 29, 2013

Diva Card

One of the gals at class asked our demonstrator if she would come up with a Diva card to give to someone at her office.

So, she came up with this one and she had all sorts of sentiments, including "Office Diva", "Birthday Diva", "Coffee Diva", "Shopping Diva" and others to choose from and I had suggested "Granny Diva" so I used that one.

We made a black card and added a layer of Melon Mambo card stock.

Then, we stamped a flourish stamp to the front of the card using black ink.  We used a pretty MS punch and punched it out in black and adhered that across the bottom.

We cut feathers from a boa and cut a strip of pink Tulle....and put that behind our scalloped circle.  You can't even see the Tulle on the card in this photo.

Lastly, we added pearls to the centers of the punch and at certain places on the stamped image.

Fun and easy card.....with the exception of cutting off the feathers and attaching them.

It's always fun to go outside of the 'box' and try new things.

Have a great day!!

hugs,
Char


Wednesday, August 28, 2013

Black and White Masculine card

Fast and easy!!!

We used black card stock and black embossed designer paper as the base of this card.

Then, we adhered a 2"x5" strip of gray cardstock to the left side and taped on alternating squares of black and white cardstock.

As you can see, I am not too good at lining up my squares.  But, you get the idea, anyway.

This is a good use of left over card stock....with pieces that might generally be too small to use.
Then, we used the Decorative Label punch and punched one in gray and one in black.  We cut the gray one in half width wise....and attached the black to the front of the two pieces of the gray.  We glued on a white oval with the sentiment, "Spoil Yourself today".

We then added a cute 'screw' brad to that.

Try this idea using all different combinations of colors.  I thought this card looked like it would be good for a masculine card but you could change it up just by changing the colors.

Have a great day!!!

Hugs,
Char

Tuesday, August 27, 2013

Christmas Ornament Card

Too early for Christmas?  Well, maybe, but not to early to start thinking about making Christmas cards if we want them in the mail on time for delivery.

I am not sure which die or Frame lit was used on this card but as you can see, it's a big one.

We cut two out and then cut each of them in half.

We attached a piece of white card stock with the corners punched to a green card.

Then, we layered the two halves of the circle to our card.  We used a MS punch to get the 'ribbon' for the middle.

We attached a hanger punched with the Tab punch and added three brads.  We added a little piece of wire that was bent to look like an ornament hook.

Then, we added a punched snowflake to the front of the ornament.

Pretty fast and fun card to make.  Although, I have to admit I wasn't a fan of that corner punch that we used on the white card stock.  That's probably the reason why it's no longer in the catalog?  Not sure, but it was a pain in the patootie to use.

Have a fantastic day!!

Hugs,
Char

Monday, August 26, 2013

Cupcake builder card

Too cute!!!  We did these in blue and also green.  I opted for the green and really liked how it came out.

We used strips of designer paper to make our background on the card.  You could use any color or combinations of colors, for that matter.

Then, we stamped our cupcakes on a piece of white card stock measuring 4"x 1 3/4" using Old Olive ink.  We added some glitter to the tops of the cupcakes using a wet glue pen and fine glitter.

Then, we placed a strip of burlap trim across the width of the card and attached a green spiral clip to that.  We made a bow from a piece of burlap ribbon and then added a tag with the sentiment, "It's Your Birthday"

I noticed in the catalog when trying to find the sentiment...that it's either not there or I couldn't find it...BUT....it would be cute to add the sentiment from the set Sketched Birthday saying, "Happy Birthday, Cupcake"

Endless possibilities!!

Have a great day!!!

Hugs,
Char

Sunday, August 25, 2013

Top Note Purse card

Here is yet another card using the Top Note Biz Die.

We cut two top note dies in red polka dot designer paper.

We attached a folded white piece of card stock (5 1/2 x 3 1/2) to the inside and adhered the two top notes to each side with the ribbon laying under the white card stock.


We used a white scalloped die and taped a red circle die over the top and adhered that to the back of the purse and folding it down over the front.

Then, we used the Pansy punch and out a white pansy and then using the Boho Blossoms punch, we punched out a red polka dotted blossom for the center of the flower.  We then added a white button to the very center of the flower and attached a red bow to that.

We used Velcro strips to close the flap on the purse.

This would be cute just as a card or even to add a GC in the middle or money or???

Have a great day!!

Hugs,
Char

Pumpkin from Top Note Die

Yet another card using the Top Note Die from SU.

For this card, we used orange cardstock which had been embossed with the Woodgrain embossing folder and then sponged with green or brown ink.

The leaves on the pumpkin were punched using Autumn Accents Bigz die and an embossing folder.

The sentiment is stamped on a piece of cardstock that was punched using the Modern Label punch.
Add a little raffia for the bow....and you're all set!!

Have a great day!!

Hugs,
Char

Saturday, August 24, 2013

Apple for the Teacher card

One of the things that we did in stamp class in August was do three different cards using the top note die.

This little apple card was one of those cards.

We used red card stock for the 'apple' and then created a face for the apple using circle punches for the eyes (white and black and cutting them in half) and nose and part of a circle punch in black for the mouth.

We cut two strips of white card stock in little rectangles and then shaped them like teeth.

The leaves are punched using the Blossom Builder punch.

Cute card for a teacher!!

Have a great day!!!

Hugs,
Char

Friday, August 23, 2013

Bird builder card

Another card we made at stamp class in August used the Bird Builder punch from SU.

We used Gingham Garden designer paper.  I love how bright and cheery it is.

I didn't ask, but I think that the ribbon is the 3/8" Stitched Satin in Summer Starfruit.

The embossing folder is Wildflower Meadow.

Again, so many colors to choose from in making this card.  I loved her little checkered wing :-)

Enjoy your day!!!

Hugs,
Char


Thursday, August 22, 2013

Treat Cup Card

Ok, now I have to admit, this card would not fair well in the mail so you would have to actually hand this to someone.

But, what a lot of different ideas you could create from this concept.

We made this card at stamp class.
We stamped a blue ribbon...and then added a treat cup to the center....but you could do other images and use candy, confetti, just about anything that would fit inside a treat cup.

Love the candy designer paper that I chose from several options we had.

I am thinking that you could even use money inside the treat cup!!  Hmmm, I just might have to do some more of these and think of ways to use them.

The only draw back I see is that they wouldn't travel well through the mail, unless you added them to a box you were sending someone.

Have a great day!!!

Hugs,
Char

Wednesday, August 21, 2013

Cards from friends

It's always fun to get cards in the mail.  Over the past couple of weeks, I have been receiving registrations for our annual WAG get together that is held in Salem, OR in September.
I started this event 10 years ago as a way for "The Angel Company" demonstrators that lived in the North Western states (demonstrators from other states were welcome, too) to come together in a smaller setting and just get to know other "Angels'.  
It has been a fun way to connect, learn new ideas, swap cards and do awesome shoebox projects.  This was our added way of getting new ideas for our business.

Three years ago, The Angel Company hung up it's 'wings' but the gals that come to WAG decided that they still wanted to meet together each September.  So, we do :-)

Here are a couple of cards that I received in the mail with their registrations.

This is a card from Tammy.  She tricked me by putting the images on the card so that the card opened from the left.  Funny, Tammy :-)  I love the hot air balloon image....and the cloud designer paper behind it.      


And, a card from Chan.
Love this stamp set and all the pastel colors on this card.  She promised she would bring the Memento inks and the stamp set so that I could CASE her card!!!  :-)

Enjoy your day!!!

Hugs,
Char


Tuesday, August 20, 2013

Love my mountains

 Taking a break from posting about card making and wanted to share some photos I have taken of the beautiful mountains that surround us.  I never get tired of snapping photos of these beauties or get tired of looking at them.

Here is a zoomed in shot of Mt Hood from our front porch, at dusk.


 This is a shot of Mt Jefferson, which I can also see from my front porch but this wasn't taken from my front porch as there are buildings that get in the way. This was taken on my way into town.  I just never get tired of this view.

Here is another shot of Mt Jefferson as seen through some wheel lines in a carrot seed field at a different time of of the year.  I had my photo printed onto some address labels and a mouse pad because I love it so much.  You can even see the water coming out of the sprinklers.


On the way up to Portland, we have to go over the pass around Mt Hood....and I get tons of photos from that highway.  But, this is a close up of it as seen from Hwy 35 coming back from Hood River, OR.


And, finally, the Three Sisters near Sisters, OR.  We love this view from Hwy 22 on the way to Sisters.

So much beauty that surrounds us and I never take it for granted.

We are truly blessed.

Have a great day!!!


Monday, August 19, 2013

More butterflies

Oh gosh, don't you just LOVE this card???

We did this at our July stamp class along with the other butterfly card I posted a few days back.

Basically, we used three rectangle pieces of designer paper.  We punched the butterflies, using the SU butterfly punch, at the very end of the pieces.

Then we adhered the rectangles to the top of the card and the butterflies just below them.  We attached a brad (or you could use some jewels or pearls) to the middle of the butterflies and then stamped a sentiment.

Again...can I say EASY???

Enjoy your day!!!
Char

Sunday, August 18, 2013

Ride em cowboy

You know any rodeo fans or someone that just likes to ride horses? (well in this case, he looks like it's bucking) Then this is the card for you or I should say, them.

But, I need to tell you that I couldn't find it in the current SU catalog so either it's retired or I missed it.

Anyway, if you have this set or one similar, it's a easy/fun card to make. Gotta love monochromatic cards!!

I also really liked using the different label punches for the sentiment.  :-)

Is it hot where you are???  I am so looking forward to FALL....but then again, Winter follows Fall....so there again...maybe not.

Have a great day!!!


Saturday, August 17, 2013

Coffee and Friends

Forgive the horrible photo, but I think you can get the idea.

Another EZ card!!  We stamped and cut out the coffee cup from the stamp set "Perfect Blend" by SU.  Then, we stamped the verse.

We put a 'sleeve' of brown card stock that had been crimped across the middle of the card....and attached some twine (mine didn't cooperate, as you can see) and then we attached our cup on top of that with dimensionals.

We then stamped the Mocha Latte sentiment across the top and bottom.

I normally would have done this card over and took another photo but I don't have that set.

I just might have to get it, though :-)

Have a fun day!!

Char


Friday, August 16, 2013

Patriotic Card

Can I say EASY???  Well, I guess I can, it's my blog....so I'll say it...EASYYYYYYYYYYYYYYYY!!

Are you seeing a theme this month?? I like cool cards but I also like easy ones for those times that I want to send out a card but don't want to spend hours and hours coming up with one.

I love to spend a lot of time on 'special' cards for special occasions but I also enjoy sending out cards that don't take hours to make.

This card uses the Perfect Polka Dot embossing folder, a heart punch and a star punch.

We layered three strips of designer paper onto our card and then adhered the two punched out pieces with SU dimensionals.   It can't get much simpler than that  :-)

Have a great day!!

Char


Thursday, August 15, 2013

Happy Birthday

Using the Alphabet Press embossing folder and the Top Note Bigz die from SU, we created a fun birthday card for just about anyone.

Choose different colors depending on the recipient and whether the person is a child or an adult (but then just because they are an adult doesn't mean that they aren't a child :-)

Again, this card could be adjusted for any occasion by using different letters, designer paper and colors.

Enjoy!!
                                                                

Wednesday, August 14, 2013

Fishin' Around

My Granddaughter and I went to stamp class, together, in July.  She made all the cards that I made, but she had a blast making a card like this one.

This is basically a very easy card to put together and we didn't take time to color the one she did as we were in a hurry to go somewhere right after class.

Anyway, we used the stamp set "Fishin' Around" from SU.

Another easy card and works well for just about anyone!

Enjoy!!!
Char

Tuesday, August 13, 2013

Fabulous Florets


Here is a card we did in class that I want to repeat with different colors and images.

Basically, we put down the 'negative' of the Labels Collection die.  If you are not sure what that means, you cut out your die and then use the piece that is left....the opening....to lay on your paper and sponge the inside.  I love the effect.

Then, using the Smoky Slate ink pad, we stamped the image on top of it.

The image we used was from the "Fabulous Florets" stamp set in the SU catalog.  But, you could use any similar image.

I want to try this idea using different dies and with several different stamps!

Have fun!!!

Char

Monday, August 12, 2013

Happy Birthday Sailor

A fun card for that boating fan in your family....or just a fun masculine card for any occasion.

Very simple and fast.  The only thing that took any time at all was tying the tiny knots in the Baker's twine before adhering it to the card.

Have a happy day!!!
Char

Sunday, August 11, 2013

Shirt Card

This was a cute card for a masculine birthday. Our instructor had a template that she had made that we used for the shirt and tie.

We used the Chevron embossing folder from SU for the background.

Then added a couple of brads to the collar and DONE!!!

Cute and fast!!

Have a great day!!
Char

Saturday, August 10, 2013

Owl Card

Here is another version of the Owl card that was given to my Granddaughter for Graduation.

But, this time, instead of a graduate, he is just an owl :-)

Using the Top Note die and some circle punches and a scalloped circle die, we put this little guy together in no time.

Once again, he/she could be dressed up for any occasion :-)

Have a great day!!!
                                                                     Char

Friday, August 9, 2013

Trio Butterfly card

LOVE butterflies.  Can't seem to quit making them once I get started.

This is one of the butterfly cards we made in class in July.

Two different SU butterfly punches and the rest is pretty self explanatory.

Endless possibilities depending on the designer paper and colored card stock that you use.
Of course, you don't have to use a decorative edge on the orange piece of card stock but I think it adds to the look of the card.  

I want to make some more of these using different colors, jewels and decorative edges.

And, it would go for almost any occasion!

Have fun with it!!

Have a great day,
Char

Thursday, August 8, 2013

Enjoy your Day

Here is yet another card we made in card class..... the coffee cup card.

For the basic card, we embossed the stripes embossing folder on brown card stock.

We then stamped swirls on white card stock and layered the coffee cup which was made out of a piece of rectangle card stock with the bottom edges trimmed.  We used a punch to just barely cut the side of a circle (for the handle) and used an oval for the bottom of the cup.

Then, we punched a little piece out of two corners of the white card stock and layered it onto dark brown card stock and attached two brads.

Pretty easy card.

Have a great day!!

Char